Extra Github for future reference
Note: This lesson is a copy from a reader we wrote for the Utrecht University of Applied Sciences. It is designed to be embedded in a larger course. We thought it would be useful for workshop participants who want to take their newly acquired skills a level further, so we included it here. If anything seems to be referring to some course you know nothing about, it probably is, and that can be ignored.
Learning goals
In this lesson, you will learn how to keep track of your file changes using Git. After this lesson:
- you know the different steps of the Git workflow (commit, push and pull);
- you know how to set up a new Git repository;
- you can keep track of your file changes using Git, RStudio and GitHub;
- you can instruct git to ignore certain files for version control (gitignore);
- you can create a personal development environment (branch);
- and you can add your personal changes to the work of the group (pull request).
Prerequisites
Before you continue with this lesson, make sure you have done the following:
- you are comfortable working with R and Rstudio
- You have installed Git on your computer.
- You have created a GitHub account.
Why Git and GitHub?
To explain why Git and GitHub are so important, let us look at an example. Suppose you are analyzing some data for your internship using R. You have written an R script to perform the data analysis and the script is working. However, one day you decide to make some changes to the script in order to make the computations a bit faster. You work the whole day on the code and at the end of the day you try if the code is working as expected. Unfortunately, it is not working as expected. But the code was working before. It would be great if you could go back to the previous version of the code. Or if you could easily see the changes you made, to find out why your script stopped working.
The example shows that it is important to keep track of your changes. Of course you could have made your changes in a copy of the original script. But in this way, you would end up with a lot of files on your computer. In addition, it is not easy to see what you changed. This is why we use version control software: software that keeps track of file changes and allows you to inspect the changes and to go back to previous versions of the files.
Git is the most popular version control software used today. It is designed to track changes of text files (files you can open in a simple text editor, such as R scripts and markdown files). Git can be easily used to track the changes of files that are on your computer.
However, you often want to work together with others (for example, fellow students or colleagues) on the same scripts. GitHub is a web-based platform that was created to promote collaboration. GitHub is based on the Git software. The platform allows you to create an online copy of your files and the Git version history. This copy can then be shared with others, who can then also contribute to the code themselves. You can use the online copy on GitHub also for yourself, for example as a backup of your code in case your computer crashes or you accidentally remove some folders on your computer.
github video
Some people are way better at explaining stuff than at visual animations. Watch the first 5 1/2 minute of this video
The Git workflow
You are hopefully convinced that Git and GitHub are the way to go. But how do you start? How can you use Git and GitHub to keep track of the file changes in your scripts? In this section, you will learn the different steps of the Git workflow. We will focus on the concepts. In part two of this lesson, we will give you a detailed protocol for how to do things by yourself.
Setting up a Git repository
Before you can use Git and GitHub to track your file changes, you need to set up your own Git repository. A Git repository is a folder in which the version control takes place. That means that all the changes of files that are located in that folder (and its subfolders) are tracked. It is best practice to initiate the Git repository on GitHub and then download it to your computer, as will be explained in part two of this lesson. This results in a folder on your computer. All files that you place in this folder will be under version control by Git.
Just as you can have multiple folders on your computer, you can also have multiple Git repositories on your computer (and on GitHub). It is recommended to create a separate Git repository for each project you are doing. For example, if you create scripts and markdown files for your internship, you create a Git repository that only contains the work of this internship. If you performed several different research projects in your internship, you can create separate Git repositories for each research project.
Saving a new version of your files (commit)
Once you have placed files in the Git repository folder, you can start to track the file changes. It is important to note that Git does not automatically track the file changes. If you do not tell Git to save the version history, it will not do anything! Hence, you need to actively tell to Git to save the file changes. The action of saving a new version of your files in the Git repository’s file history is called a commit. It is recommended to regularly commit your changes, preferably several times a day.
Updating the GitHub repository (push)
When you commit your changes, the Git repository on your computer will be updated: a new version of your files will be added to the version history of the Git repository on your computer. However, the online copy of your Git repository on GitHub does not get updated, unless you tell Git to do so. The process of updating your Git repository on GitHub based on local changes (new versions on your computer) is called pushing (you ‘push’ the changes from your computer to GitHub). You can push your changes each time you commit your changes, but it is also possible to push all the commits at once at the end of the day. However, it is recommended to push your changes at least once per day, to keep the copy of your Git repository on GitHub up to date.
Updating your local Git repository based on changes in GitHub (pull)
If you work together with other persons, it may be the case that the Git repository on GitHub has been changed by your collaborators/colleagues. These commits are then present in the Git repository on GitHub, but not in your local Git repository. In other words, the Git repository on your computer is lagging behind the Git repository on GitHub. In this case, you want to update your Git repository on your computer based on the changes on GitHub. This update process is the reverse of pushing, hence it is called pulling (you ‘pull’ the changes from GitHub to your computer).
Pulling is only important if other persons contributed to the repository. In part two of this lesson, we will focus on the simple situation were you work alone on your files and you are the only person contributing to the Git repository on GitHub. In part three, we will explore the best practices for working together on the same files.
Git and RStudio
In this section, we will give you a detailed protocol for working with Git using RStudio. This protocol assumes that you are the only person that contributes to the Git repository. If you work together with other persons, you will need additional tools than the ones presented here. You will learn more about these tools in the next lessons.
Creating a new Git repository
Before you can track your file changes using Git, you first need to set up your Git repository. It is best practice to create your Git repository on GitHub and then download a copy of the Git repository to your computer. We explain these two steps in detail below.
Step 1: Creating a new Git repository on GitHub
To set up your Git repository, you go to the GitHub login page and log in with your credentials. You are then taken to the home page. On the left side, you can find a panel with your repositories (if you have any). Here, you can click on ‘New’ to create a new repository (see figure below, top panel).
Once you click on ‘New’, you will be taken to a menu were you can specify the details of your new Git repository. The menu consists of the following parts (see also figure below, bottom panel):
- Repository name field: in the repository name field you can specify the name for your new repository. GitHub will automatically check if another repository with the same name already exists.
- Public or Private: when you create a new repository, you have to indicate if you want to create a public or a private repository. A public repository can be found and downloaded by anyone on the internet (although only specified persons can contribute to the Git repository). A private repository is only accessible to persons specified by you (the owner). Although you promote reproducible research by creating a public repository, this not always possible. Especially if you are employed (or doing an internship!) at a company or other agency, your employer often does not allow you to make your files public. Always check with your employer (or supervisor) to see what is allowed. Choose a private repository if you are not sure!
- Initialization files: when you create a repository, you can create some ‘initialization files’. These files include a README file, a gitignore file and a license:
- README file: a README file is a file that contains information about the repository. This file should be read by everyone that is planning to use the files in the repository. It usually contains information about the content of the Git repository. You can create the README file when creating the Git repository, but you can also do it later.
- gitignore file: we will explain the purpose of the gitignore file in detail below. In short, the gitignore file contains all the file names of files that should not be tracked by Git. That means that you cannot commit changes to files that are in the gitignore file. On GitHub, you can easily create a gitignore file that is specific for the programming language you are using. It is therefore recommended to create a gitignore file (for example for R) when creating the Git repository.
- License: when you create a public repository, it is important to add a license to your repository. The license states what others can do with the files in the Git repository. For example, with an MIT license, you allow others to use your file for any purpose they like (even for commercial applications). Similarly, if you want to use the files of others, it is important to check their license to see what you can and cannot do. Please check the resources for more information about licenses.
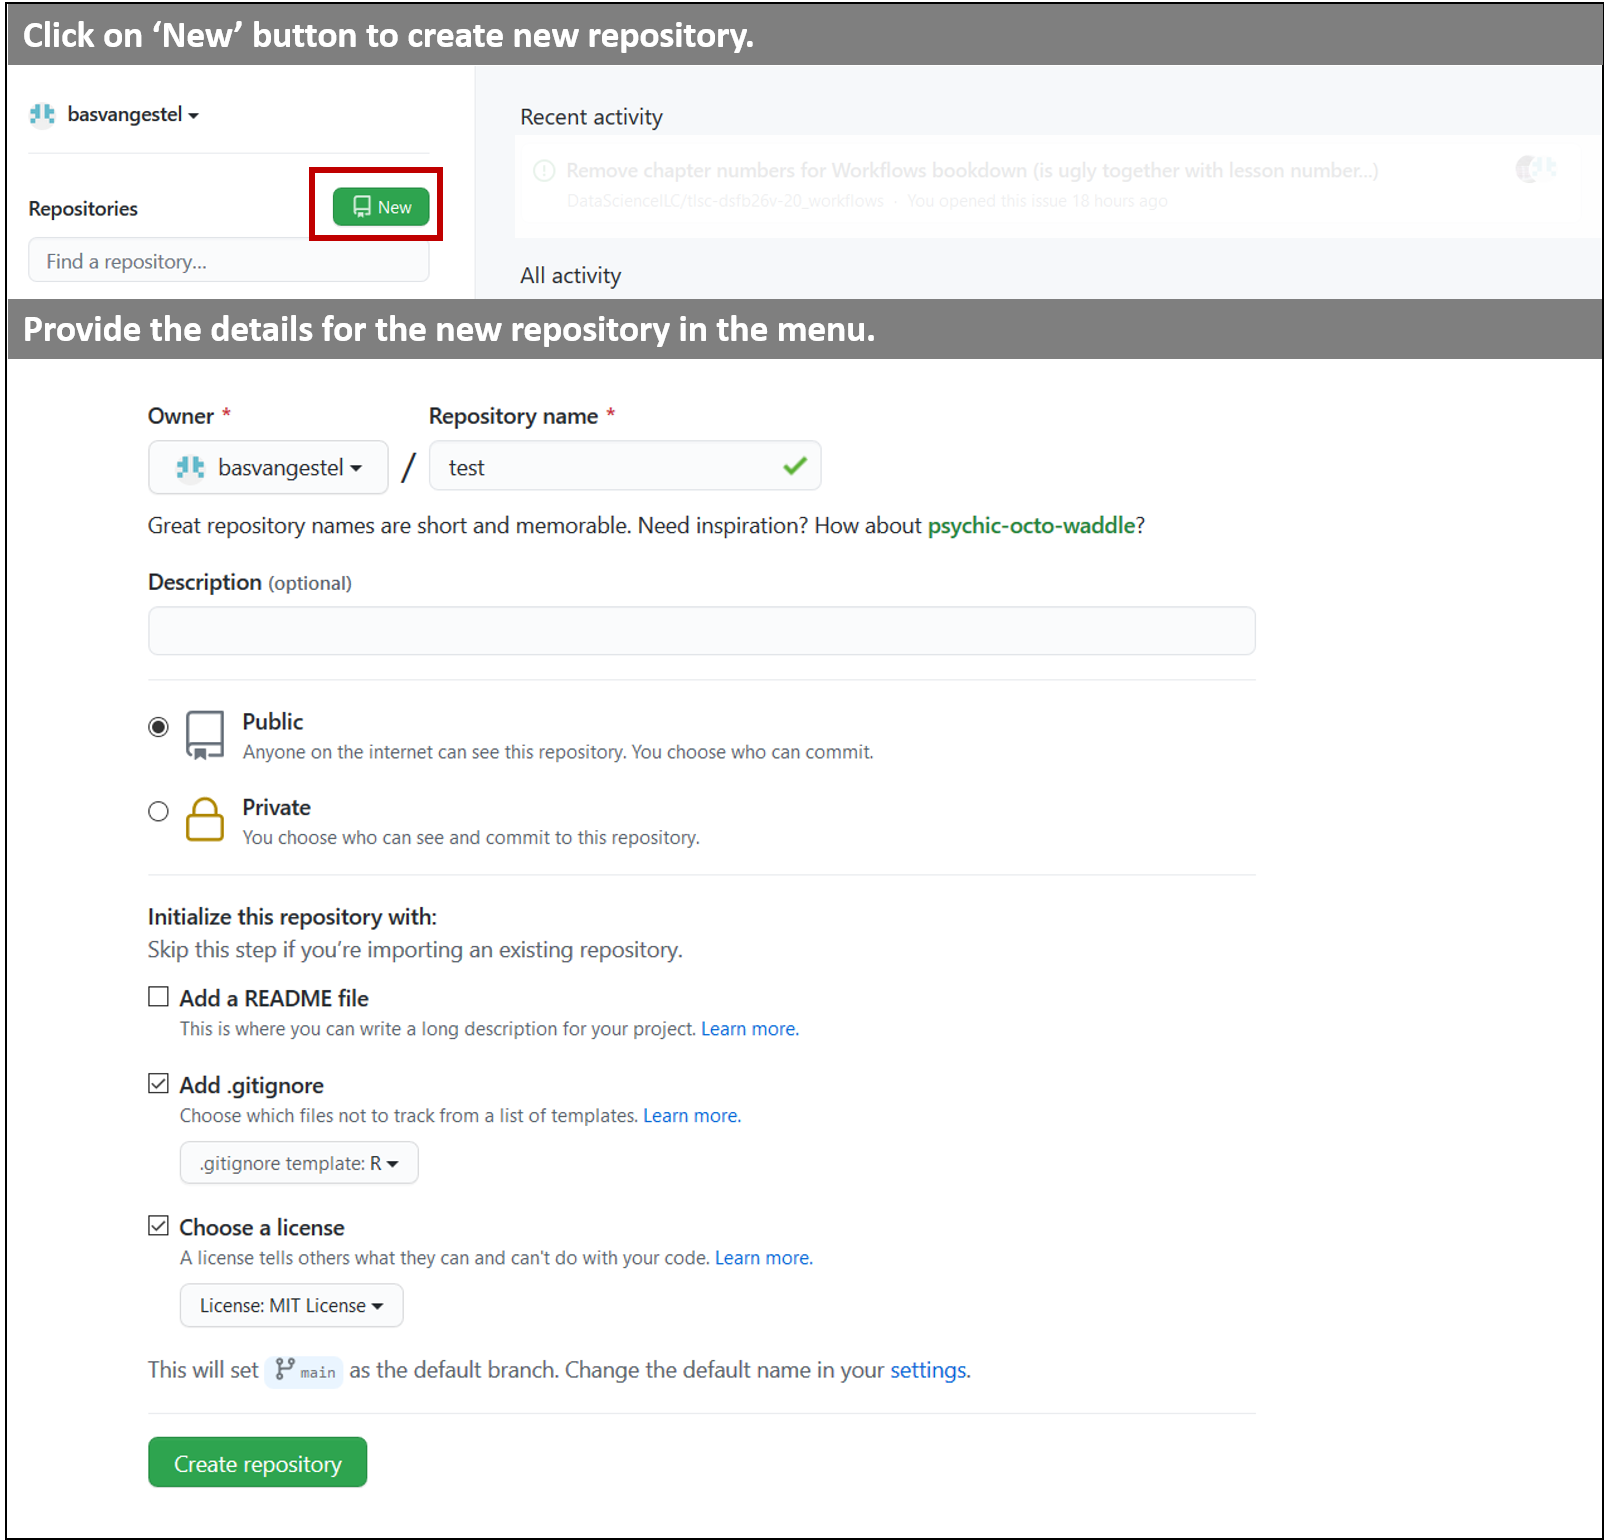
Figure 2: Creating a new Git repository on GitHub. See the main text for the details.
Let’s try the git workflow on github first.
Follow the tutorial here starting from “commit your first change”.
Step 2: Downloading the Git repository to your computer (cloning)
Once you have created a Git repository on GitHub, you can download the repository to your computer. Downloading a Git repository is called cloning. The steps for cloning a Git repository are as follows:
- Copy the GitHub link to the new Git repository (see figure below, top panel).
- In RStudio, go to File > New Project…
- In the Project menu, select ‘Version Control’, then ‘Git’ and subsequently enter the details of the Git repository (see figure below, bottom panel). Also select the folder in which you want the repository to be located.
- Click ‘Create Project’.
RStudio will now create a new R Project and clone the Git repository from GitHub.
As you learned in the DAUR1 course, it is best practice to use R Projects if you are working with RStudio. Using the above steps, you can easily couple the R Project to the Git repository. All files in the R Project folder will now be tracked for version control. These files can be R scripts, (R)markdown files, but also (among others) bash scripts.
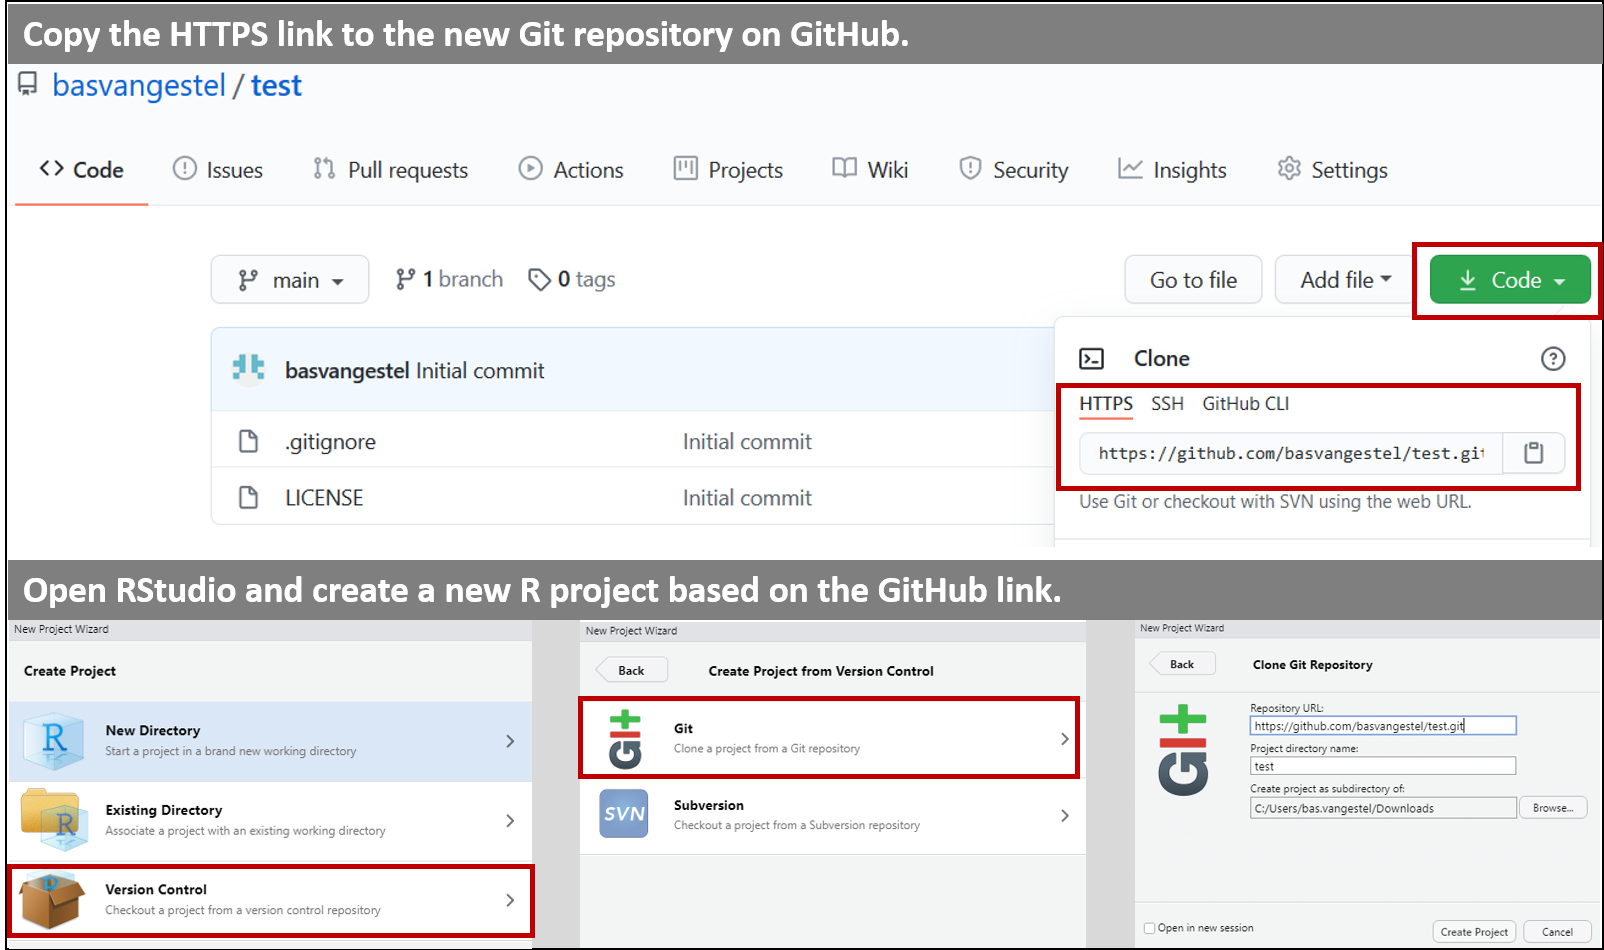
Figure 3: Downloading the Git repository to your computer using RStudio. See the main text for the details.
How to work with Git in RStudio
OK, you are ready to go! You have created your first Git repository and you can now start to add files and track their changes. In this part, we will show you how to commit your changes and how to push your changes to the Git repository on GitHub.
Git personal access token
Github uses personal access tokens. You will have to generate one on github, and tell Rstudio / git on your computer what is is.
Copy the following to the console:
install.packages("gitcreds")
library(gitcreds)
gitcreds_set()
Rstudio asks for a github token. Let it wait for a bit. Go to your browser. Generate your token by following these steps.
Copy your token (you only get to see it once!) and paste it in Rstudio (who was still waiting for your reply).
You will probably have to give Rstudio your github name and password later as well. We’ll get to that.
Getting started with Git in RStudio
We will start by creating a new R script and saving it in the directory of the Git repository. In the right upper corner of RStudio, you can find a submenu called ‘Git’. If you open this menu, you can see the changes you have made to the repository (see figure below). These changes may be new files that you just added to the repository, but they also can be changes to the content of pre-existing files.
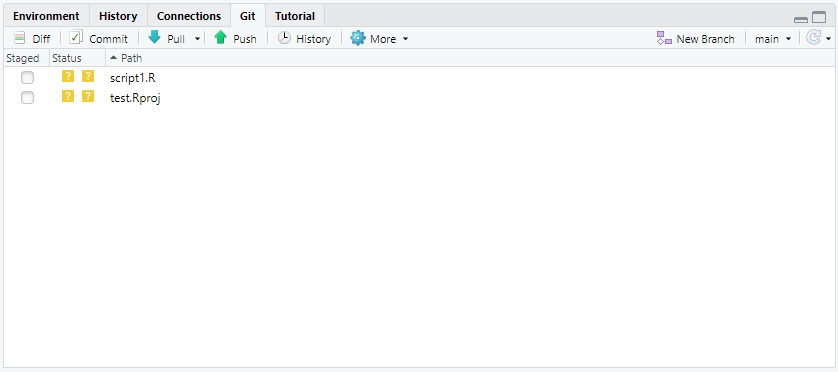
Figure 1: Git menu in RStudio.
In this Git menu, you can perform all your Git actions, including committing your changes, pushing your changes to GitHub or pulling GitHub changes to your computer. We will now discuss these steps in detail.
Saving a new version of your file (commit)
You just created a new R script. In addition, by cloning your Git repository from GitHub, you created a new R Project file. These changes need to be stored in the Git repository. In other words, you need to commit the changes to the Git repository. You can do this by clicking on the ‘Commit’ button in the Git menu. A new window will then open. In this window, you can select the changes you want to commit to the Git repository (see figure below, left upper corner). Note that by selecting a file, you can see the changes in the bottom panel of the window (in which lines in green are new/added lines and lines in red are old/removed lines). After selecting the files you want to commit, you can write a commit message in the upper right panel. This commit message is necessary to later on easily distinguish the different commits in GitHub. It is therefore important to write commit messages that clearly indicate the changes you made in the commit. Finally, you can commit your changes by pressing the ‘Commit’ button. You can now close the commit window (also the other window that pops up after pressing the ‘Commit’ button).
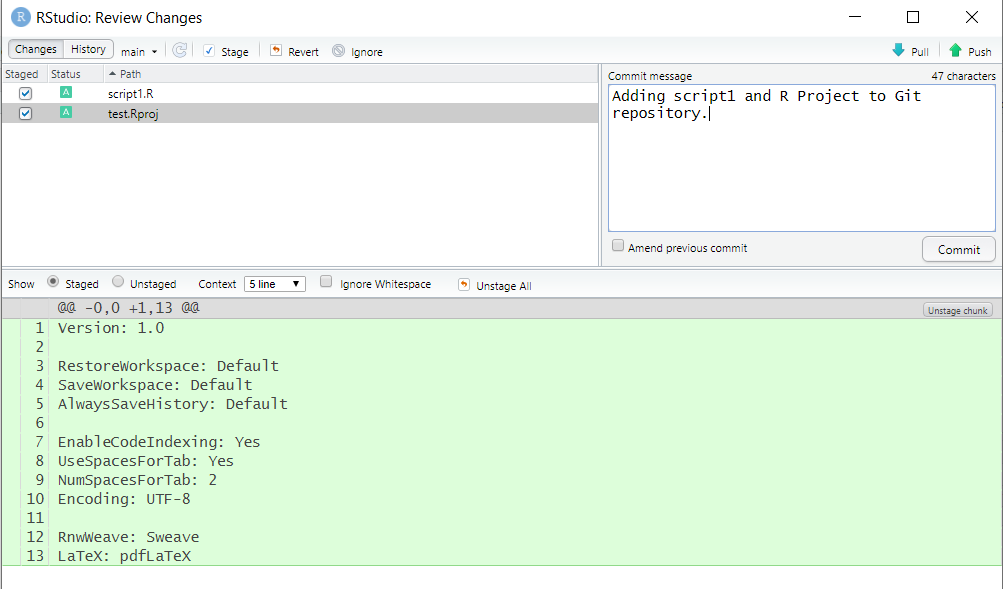
Figure 4: Committing changes in RStudio.
Updating the GitHub repository (push)
After committing your changes, you have to update the GitHub repository. You can do this by pushing the recent commit(s) to GitHub using the ‘Push’ button (with the green, upward pointing arrow) in the Git menu.
The first time you push commits to GitHub from a repository in RStudio, you will be prompted for your user name and password. Likely, Rstudio will save your credentials, so that you will not have to enter them again. If it doesn’t, type the following in the terminal:
git config –global user.email “you@example.com”
git config –global user.name “Your Name”
After pushing your changes, you can see the new/changed files in GitHub (you may need to refresh your page to see the changes). GitHub also offers a nice interface to see the exact file changes for each commit. In the main menu of your repository, you can click on the ‘commits’ link and subsequently select your most recent commit. You will then see all file changes that were committed during that commit (see figure below).
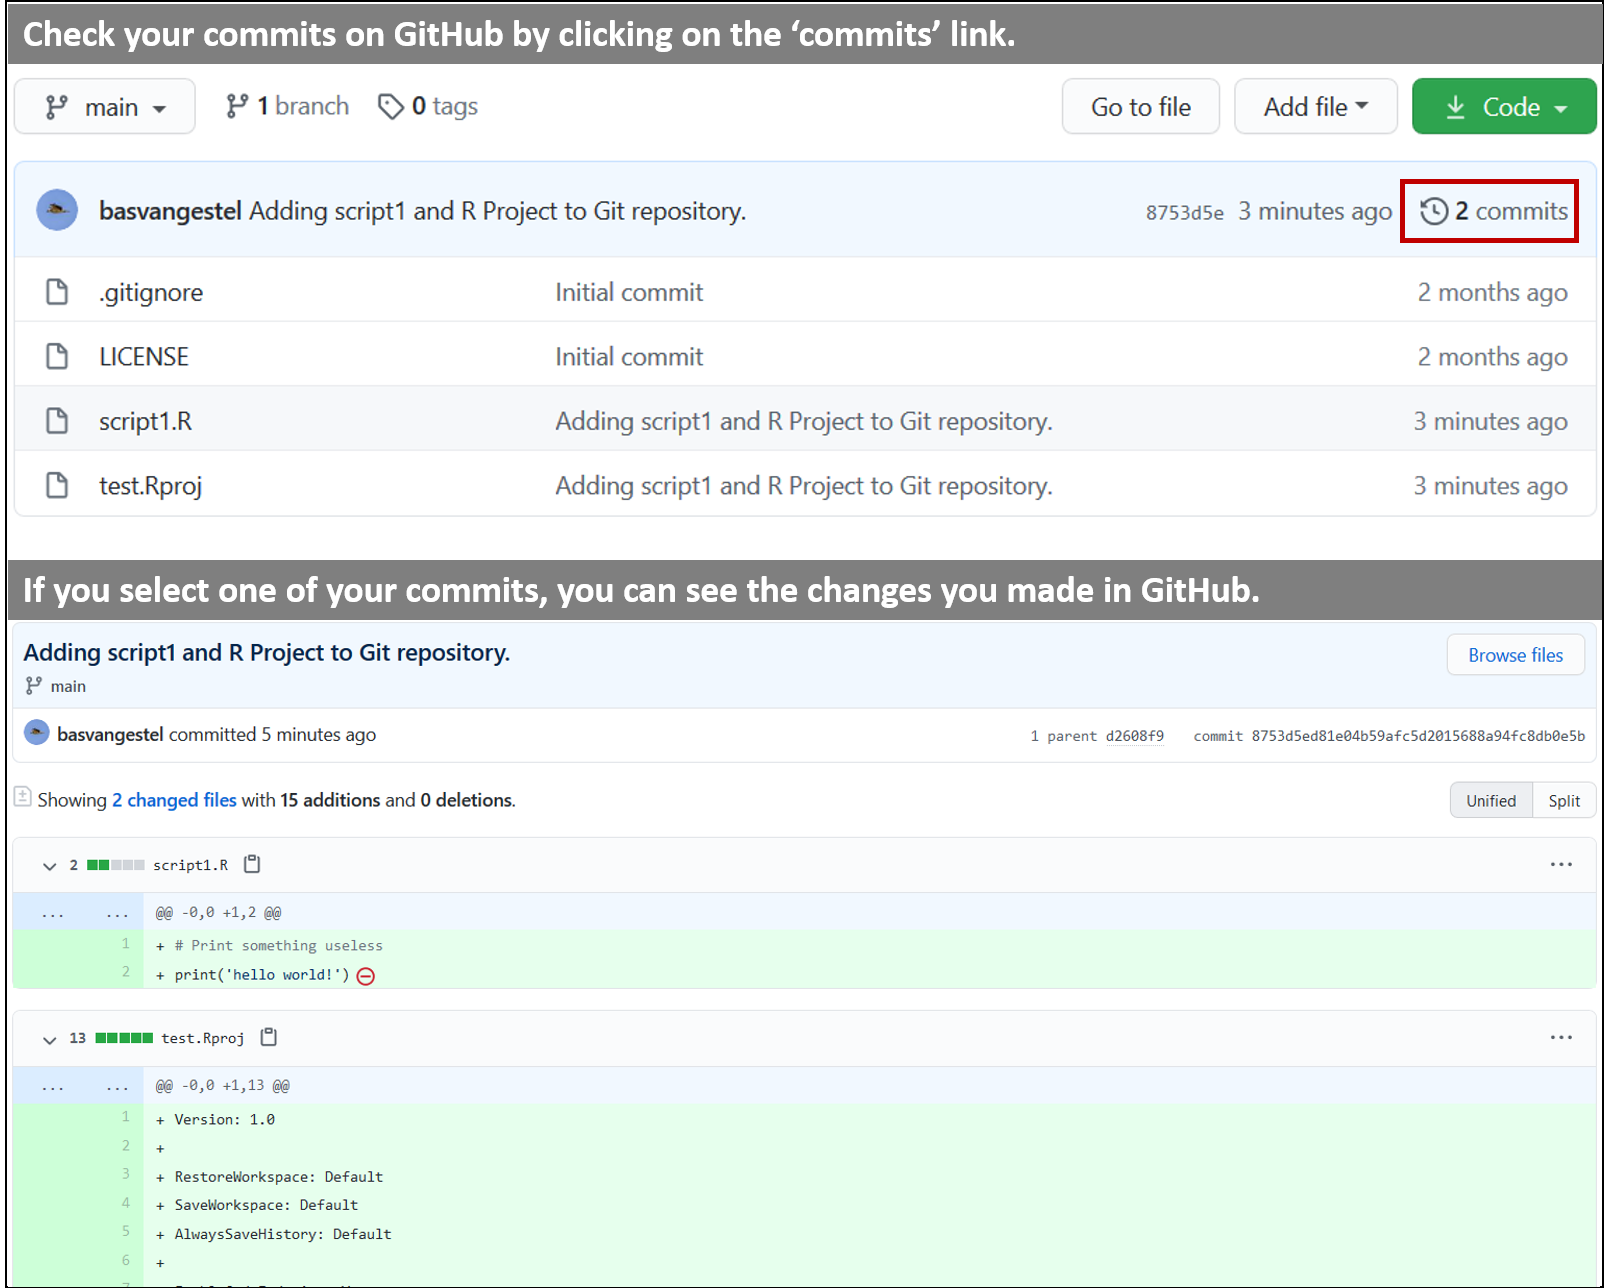
Figure 5: Check out your commits in GitHub.
Ignore files for version control (gitignore)
Some file changes do not have to be tracked by Git. These include file changes to files that are generated automatically by R (such as .RData and .Rhistory files) or other software. You can indicate to Git to ignore these files by creating a gitignore file in the Git repository. This is just a simple text file that is saved as ‘.gitignore’ in the Git repository. In this file, you store the names of the files you want to ignore. You can also ignore entire directories or files with a certain file extension (see this page for the syntax).
As indicated above, you can easily create gitignore files on GitHub when you create your Git repository. On GitHub, you can select your programming language and then create a gitignore file that ignores system files of that programming language. You can always add other files and directories to the gitignore file yourself later.
Using Git outside RStudio
In the text above, we explained how to use Git in combination with RStudio. However, you may also want to use Git with other programming languages, such as Python or Bash, outside RStudio. Of course this is possible. In fact, Git was designed to be used independently, as a simple command line tool. Once you install Git on your computer, you also install the Git Bash command line tool. You can use this tool in every directory of your computer to initiate Git repositories or to maintain them. Below, we will show you how you can do this and we learn you the most important commands.
Suppose you want to clone the Git repository outside RStudio in a directory on your computer. You can do this by browsing on your computer to the destination folder. In this folder, you can right click with your mouse and select ‘Git Bash Here’ (see figure below). A command line will open, which is basically a Linux command line.
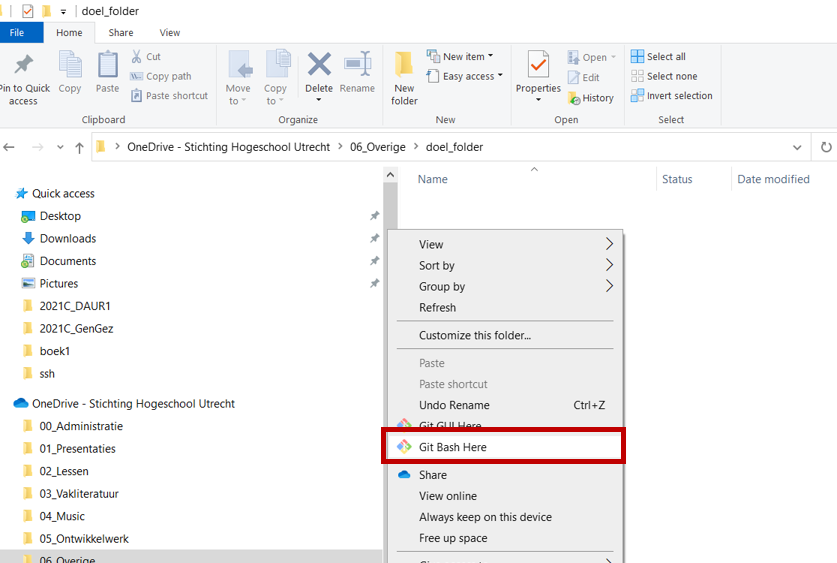
Figure 6: Open Git Bash tool in a folder on your computer.
You can now clone the Git repository from GitHub using the following command (of course replacing the link with the link of your own repository):
git clone https://github.com/basvangestel/test.gitA new folder will now be created. In this folder, the files of your Git repository are located. Now you can go to this folder and add/change files. With the following command you can see which files have been changed:
git statusYou can commit the file changes with the following command:
git add --all; git commit -m 'your-message'This command may look a bit difficult. The first part (git add --all) corresponds to selecting (all) the files in the RStudio commit window. Note that with this command you commit all file changes, unless they are ignored as indicated by the gitignore file. The second part (git commit -m 'your-message') corresponds to writing your commit message and pressing the commit button in the RStudio commit window.
Finally, you can push and pull changes using the following commands:
git push origin main
git pull origin main
Exercise
making a repo
- Create a new Git repository on GitHub. Make sure that the Git repository contains a gitignore file for R.
- Clone the Git repository to your computer using RStudio (hence creating an R Project on the fly).
- Create an RMarkdown file in the Git repository with the following content:
---
title: "My own RMarkdown file"
output: html_document
---

This is my first RMarkdown file tracked by Git!!- Commit the changes to the Git repository and push the changes to GitHub. Check the commit on GitHub to inspect the file changes.
- Add some extra lines to the RMarkdown file and change the title. Commit the changes and push the changes to GitHub. Check the commit on GitHub to inspect the file changes.
Exercise
gitignore
Use the Git repository of the previous question for this question.
- Create a directory called ‘data’. Add a few Excel files in this directory and also some csv files (you can also just create some empty files using Excel). Check the Git menu in RStudio (but do not commit anything!).
- Update the gitignore file in such a way that all the files in the data directory are ignored. Check the Git menu in RStudio (refresh if necessary). What do you see?
- Update the gitignore file in such a way that all the Excel files in the data directory are ignored. Check the Git menu in RStudio (refresh if necessary). What do you see?
Click for the answer
- Add to the gitignore file a line with
data/**. The files in the data directory are removed from the Git menu. - Change in the gitignore file the line
data/**fordata/*.xls. Now only the Excel files are ignored, but the csv files appear in the window again.
Exercise
Clone & commit
- Clone the Git repository that you created on GitHub (the same one again) to a folder on your computer using the command line.
- Change the RMarkdown file. Check the changes using
git status. What do you see? - Commit your changes and push the changes to GitHub using the command line.
Exercise
Mess around
Try changing some stuff, committing and pushing again.
Take some time to get used to this workflow.
Click around in github and get to know the site. We will discuss branches next lesson and issues and projects the lesson after.
What could you do if github doesn’t accept your push command from Rstudio anymore?
Click for the answer
If things get so messy that you are not able to upload a changed file, just download a new clone of your repo (file –> new project –> version control –> etc). Then copy your changed file into this new folder, commit and push.
You could also check if your mess up is listed here or if you prefer, the same site without swears here.
The extended Git workflow: branching & merging
Suppose Bas and Marc are working together on a (data analysis) project. For this project, Bas created one shared Git repository on GitHub in which Bas and Marc can store the scripts for the project. Bas and Marc both cloned this repository to their laptops. Every now and then Bas and Marc make changes to the scripts. You can imagine that this may go wrong: Bas and Marc are both adding/deleting things from the Git repository at the same time from different computers and this can result in conflicts. For example, Bas may decide to add an extra line to script1 and commit/push the changes to GitHub. Marc, who still works on the old version, then removes some lines from script1. When Marc now commits/pushes the changes to GitHub an error will occur, because Marc’s changes are not in line with Bas’ changes.
Clearly, if you are working together with other persons, the workflow presented previously is too simple and can give rise to conflicts. Fortunately, Git offers additional tools for working together. The most important tool is a branch. A branch can be seen as a development environment in Git in which you store your commits. When you create a Git repository in GitHub, you automatically create one branch, the main branch. In the default state, you store all commits in this main branch. If you are working with multiple persons on the same project, it is best practice to have a development branch for each person. You can create such a development branch anytime during the project. When you create a development branch, you basically create a copy of the main branch (you ‘branch off’) in which you can work without affecting the content of the main branch. In this development branch you can commit/push as you normally would do in the main branch. After you made your changes and you know that the scripts are working as expected, you can add your changes to the main branch by merging your development branch with the main branch. You can most easily perform this merge on GitHub (where it is called a pull request), because of GitHub’s user-friendly interface. After that, you can pull the updates in the main branch to your computer.
In summary, the workflow for projects with multiple persons consists of the following steps:
- The person that wants to make some changes to the project, creates a development branch.
- This person can then make changes, commit the changes and pushes them to GitHub.
- On GitHub, the person can create a pull request to add his changes to the main branch.
- All the team members can now pull the changes to their computer.
Below, we will explain these steps in detail and we will show how you can perform the steps in RStudio and GitHub.
Creating a new development environment (branching)
If you are committing your changes to the Git repository, the default is to commit the changes to the main branch. If you are in RStudio, you can easily see on which branch you are working by checking the Git menu:

Figure 7: The main branch in RStudio.
You can create a development branch by clicking on the purple ‘New Branch’ symbol in the Git menu:

Figure 8: Create a new branch in RStudio.
Make sure that you pull once before creating your development branch, to make sure that your main branch is up to date. You can pull using the blue, downward pointing pull arrow in the Git menu. Once you click on the ‘New Branch’ symbol, a new menu will open. In this menu, you can choose the name for your development branch. For the other options, you can accept the default settings (see figure below).
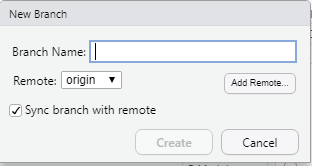
Figure 9: Branch menu in RStudio.
After creating the development branch, you can see that you automatically switched from the main branch to the newly created development branch.
Saving a new version of your files (commit and push)
Now that you are on the new development branch, you can start changing files. Change some files in any way you like. After you made your changes, you can commit your changes and push the changes to GitHub as explained in the previous section. You can also see the changes you made in GitHub by selecting the correct branch. You can do this in the ‘code’ menu of your repository:
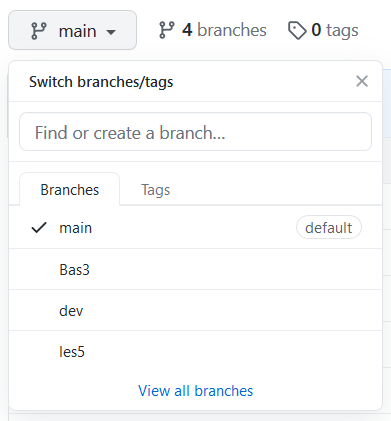
Figure 10: Branch menu in GitHub.
Creating and resolving a pull request on GitHub
Once you finished making your changes, you can add the changes to the main branch. The easiest way to do this is to create a pull request on GitHub. On the GitHub website go to the pull request menu (again: do all this. don’t just read about it):

Figure 11: Pull request menu in GitHub (1).
Usually, you will see a message in this menu that states that your development branch had some recent pushes. You can then click on the ‘Compare and pull request’ button. If this message is not visible, you can click on the ‘New pull request’ button. In both cases, you will go to a new page that looks like this:
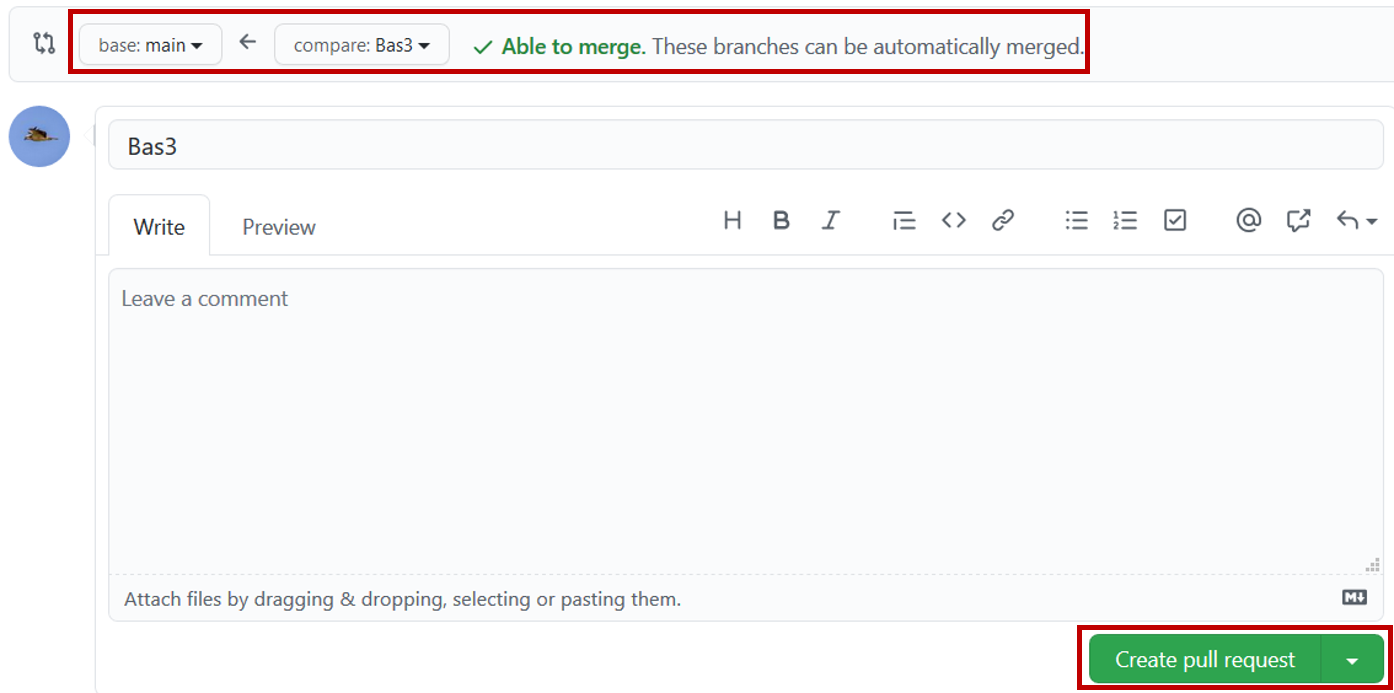
Figure 12: Pull request menu in GitHub (2).
Here, you have to check if the branches that are going to be merged, are correct. In this case it is correct: the development branch ‘Bas3’ will be merged into the main branch. GitHub also checks for you if there will be any conflicts when merging. If everyone in your team follows the workflow as indicated in this lesson, there will rarely be conflicts. If everything is OK, you can create the pull request by clicking on the ‘Create pull request’ button.
After you created the pull request, you will be automatically guided to the page where you can resolve the merge request:
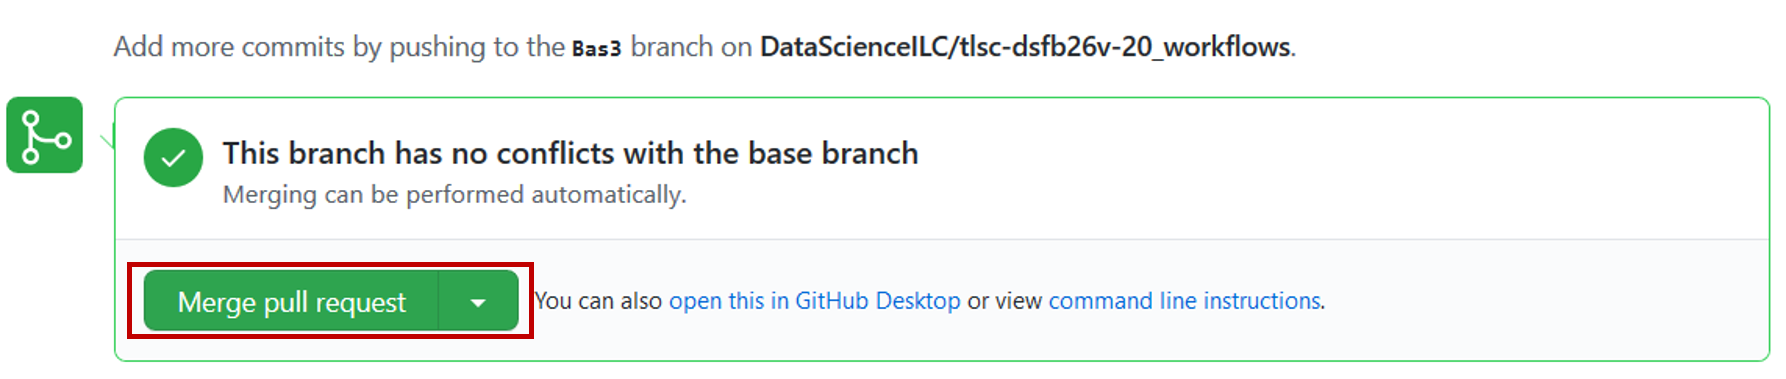
Figure 13: Resolve pull request in GitHub (1).
Click on ‘Merge pull request’ and subsequently on ‘Confirm merge’. If the merge was successful, you will see the following:

Figure 14: Resolve pull request in GitHub (2).
You can now delete the development branch from GitHub by clicking ‘Delete branch’.
Downloading the changes to your local repository (pull)
Your Git repository on GitHub is now up to date again, but the main branch of your local Git repository (on your laptop) still needs to be updated. For this, you first switch to the main branch using the Git menu in RStudio:
Figure 15: The main branch in RStudio.
Then you pull the changes from GitHub to your local Git repository using the blue, downward pointing arrow in the GitHub menu.
Deleting the local development branch
You have updated the Git repository on GitHub and on your laptop. You have also removed the development branch from GitHub. However, the branch is still present on your laptop. You can remove the branch by opening the Terminal in RStudio and typing the command git branch -d Bas3 (of course you have to use the name of your development branch instead of ‘Bas3’). Try this.
The circle is closed: you have made some changes to the project using a development branch and merged this branch into the main branch. If you want to make some new changes, you can create a new branch and follow the same steps for these new changes.
Exercise
Use a Git repository with a Rmarkdown file.
- Create a new branch in RStudio.
- Modify the markdown file by adding some additional text. Save the changes and commit/push the changes to GitHub. Go to GitHub and try to find the commits of the new branch.
- In RStudio, change to the main branch. What happens to your recent changes in your RMarkdown file? What happens if you change to your development branch?
- Merge your changes with the main branch by creating and resolving a pull request. In RStudio, switch to the main branch and pull your changes. Does the RMarkdown file now have the changes?
- Delete the local development branch using the command line.
Click for the answer
- The changes disappear, because the changes are only present in the development branch and not in the main branch. If you go back to your development branch, the content reappears.
- After resolving the pull request on GitHub and pulling the changes to your computer, you should be able to see the file changes in the main branch.
- You can delete the branch on your computer using the command
git branch -d <branch-name>.
Collaboration
The workflow proposed below is documented here:
Exercise
Github documentation
Study the github documentation on “Project Boards” here
Setup a github project in your github account.
Link your repo to the github project you just created.
Issues
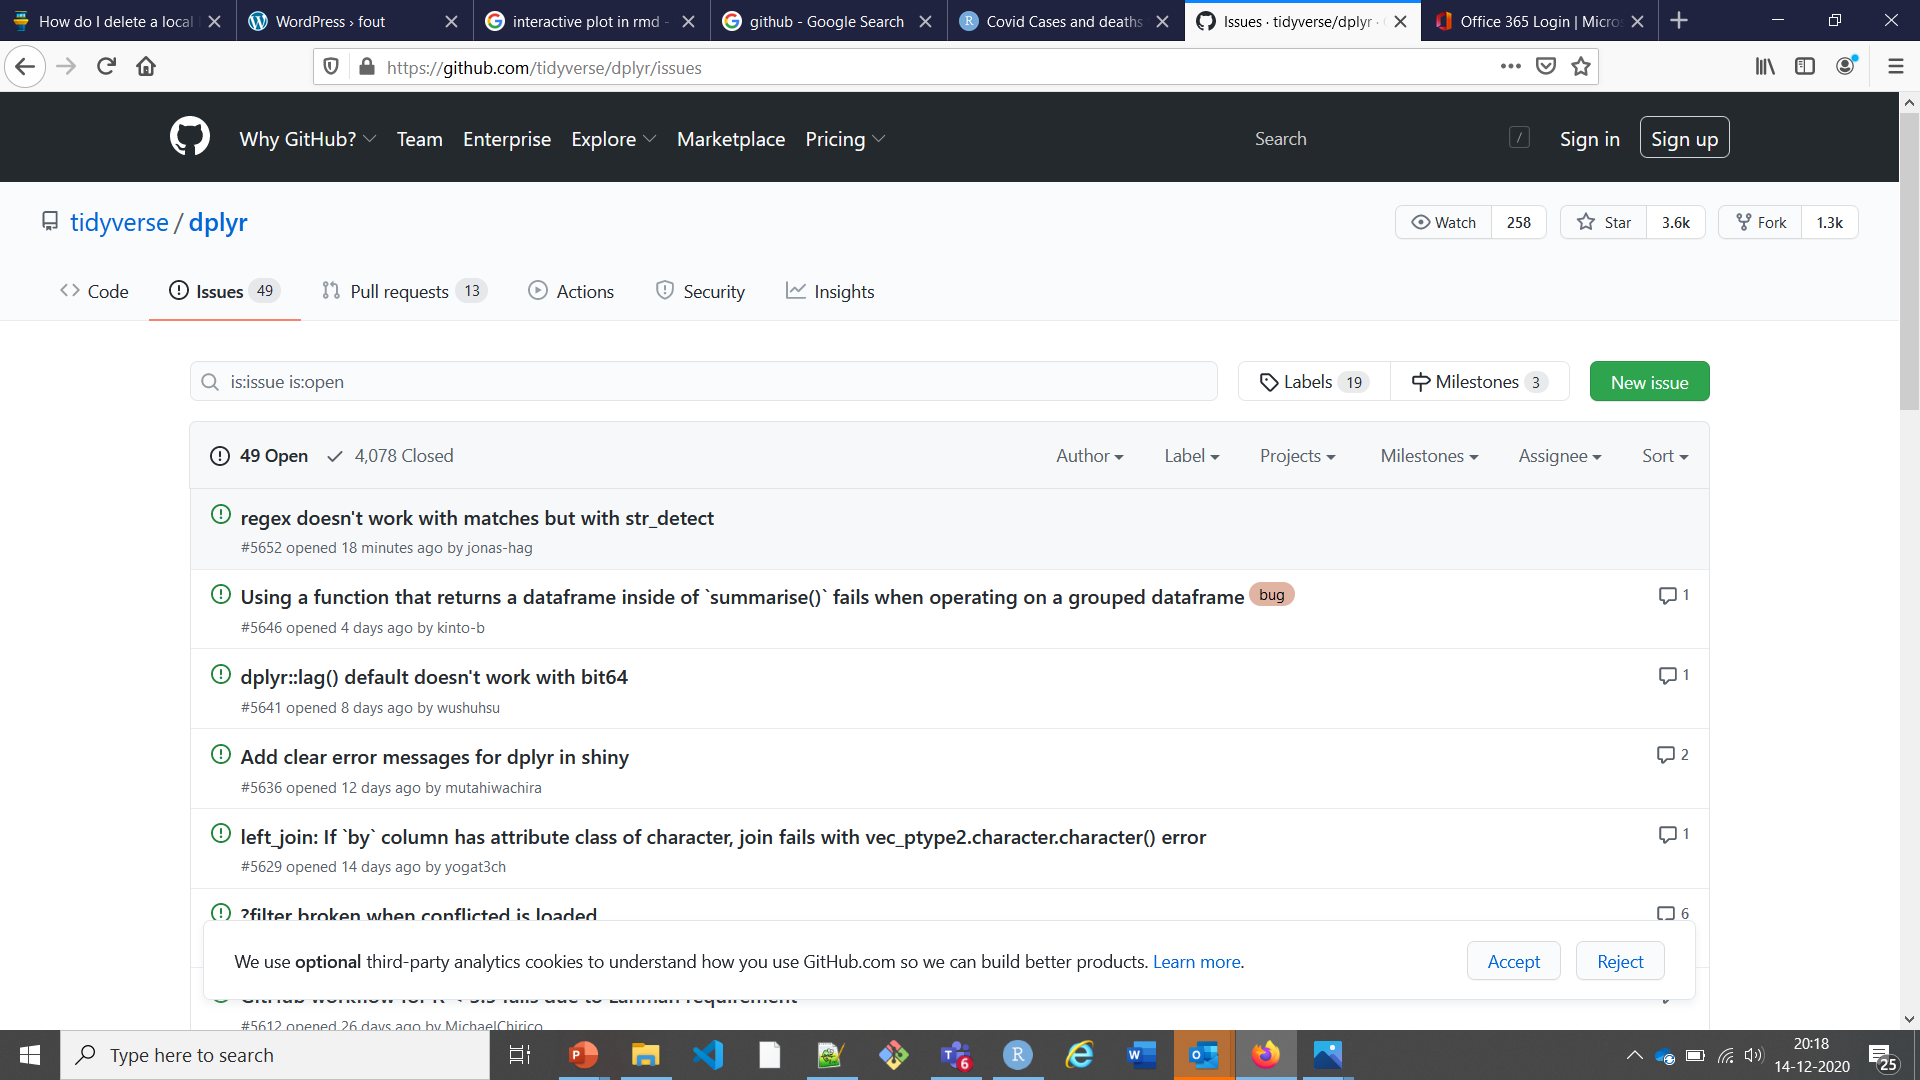
Github issues are the core for collaboration with people within and outside your code project. Issues can be used for external people to report a bug, a feature request or a question regarding functionality or implementation. People using for example your package can ask questions or report problems in the form of an issue. Below, an example is shown for the {dplyr} R-package, which has a huge user community.
knitr::include_graphics(
  here::here(
    "images",
    "dplyr_issues.png"
  )
)
Posting an issue when you encounter an error or bug helps developers create robuster code and is the core driving force for developing new features or resolving problems in open source software. Opening issues is an easy way to start contributing to the open source community.
Exercise
Looking at issues to learn from others
- Review the first bug you can find on this page:
https://github.com/tidyverse/dplyr/issues
Read the description and the proposed solutions if any. Describe in your own words what the bug relates to. Discuss the bug with a fellow student.
- Review issue
#5640in the{dplyr}issues. Why was this issue closed? Was the issue resolved for the user who reported it?
Creating issues in your project repo
When collaborating together on project repository, you can create issues to stay on track for the different actions that need to be undertaken. Issues can be related to adding functionality (code) to the project, but also to report a bug or to request the addition or improvement of documentation. You can create an issue by opening the Issues tab and creating a new issue by clicking the green New issue button. A form will open where you can add a title and further remarks to document your issue. The formatting of the Leave a comment field can be entered using Markdown formatting. When creating an issue, it is important to assign (preferable one) person to the issue. You can also choose a label, and if needed you can customize the label categories. When a Kanban/Project is also linked to the organization or repo, you can also add the issue to a Kanban board.
Exercise
Follow these steps to complete this exercise:
- Add your first issue to the issue list in your repo. For example: start with editing the README.md file to contain information on the project and the repo.
- Assign the issue to yourself (or a coworker)
- Assign the issue to the Github project linked to the repo (if you have no project, create it and ad the repo as a linked repo to the github project)
- Create a new branch in the repo that you call issue_
- Clone (or pull if you already cloned the repo) the new branch to your RStudio project environment
- Solve the issue in your ‘local’ version of the repo
- Write a commit that addresses the issue solved and that also includes this phrase: “fixes #
”. Replace the <issue_number>part with the issue number that you are trying to push. - Generate a pull request and merge the pull request to the main branch
- Check the issue list to see if the issue was automatically closed
- Check the issue on the project Kanban board to see if it was automatically put in the
closedcolumn. - Delete the branch related to the issue you just resolved
One issue per change, one issue per branch [fixes #<issue_number> and new branch]
In the exercise above we saw how to open, fix and automatically close an issue. But what defines an issue and how would you prevent working on the same piece of code when working together.
In the main resource used for this piece in the course, we can read this about branches (as was already explained previously):
Branching is a core concept in Git, and the entire GitHub flow is based upon it. There’s only one rule: anything in the main branch is always deployable.
Because of this, it’s extremely important that your new branch is created off of main when working on a feature or a fix. Your branch name should be descriptive (e.g., refactor-authentication, user-content-cache-key, make-retina-avatars), so that others can see what is being worked on.
When working together in git/github, this flow is extremely important to agree upon and than stick to it.
Resources
Git command line
- Git - the simple guide. This web resource provides a simple explanation of Git and its commands.
- Pro Git book. This book explains the principles behind Git and also provides a great introduction to the Git command line.
Git and R(Studio)
- Collaboration and time travel using Git. In this video (approximately 45 minutes), R guru Hadley Wickham explains the concepts of Git collaboration and Git version control.
- Happy Git with R book. This book is a nice resource for R users that want to use Git in their projects.